free UK postage
over £40.00
Search


Welcome to the second part of the fabulous Simple Steampunk Album designed by Design Team Member Mandy. If you haven't seen the first part yet, you can find it in the links at the end of this post.
So over to Mandy for part two...
Inside cover pages:
The left and right inside front cover pages are the same.
The page I used is ‘Pumpkin Power’; keep to 8” wide and trim to 5 ½” high.

I then stuck the paper down on a gridded craft mat with Tiger tape and lined up with one of the lines with a ruler so I could get my die nice and straight and in the same position on both pages. Then cut out the largest straight pierced pocket die

Ink the edges then using the photo as a guide so you leave a space for a tuck spot, glue on the back of the page with book binding glue and stick down.

Repeat for the other side of the inside cover page

Page 1:
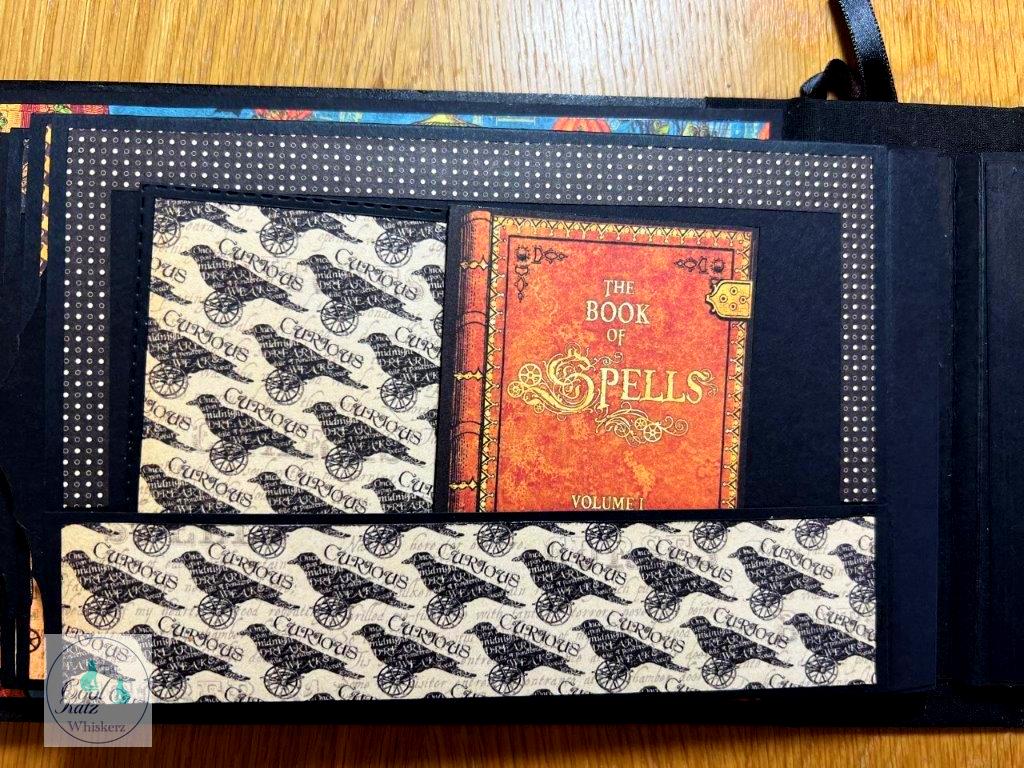
Take the ‘Steampunk Spells’ page and cut to 7” wide by 4 ¾” high and using the middle photo slot die from Curved Photo Slots Set 2 line up centrally and run through die cutting machine.

Ink edges, carefully glue on the back; it helps to put a photo mat in (see photo below) then stick down to the plain side of page with no pocket.

Jotting your page number on a post-it or Soft Paw Orange Tape and sticking that to your page can help keep them in order.

Page 2:
Take ‘Beware page’ and cut to 7” wide. Then you need to cut it into 2 more pieces of different heights, one to 7” wide x 1 ½” high and another piece to 7” wide x 3 1/8” high.

Ink edges and stick down.

Page 3:
Take the Beware page and cut to 7” wide by 4 ¾” high, and using the middle photo slot die from Curved Photo Slots Set 2 line up centrally and run through die cutting machine.

Ink edges and carefully glue on the back; it helps to put a photo mat in (see photo on page 1) and stick down to the plain side of page with no pocket.

Page 4:
Take ‘Witching Hour’ and cut to 7” wide. Then you need to cut again into 2 pieces of different heights, one to 7” wide x 1 ½” high and another piece to 7” wide x 3 1/8” high.

Ink edges and stick down.

Page 5:
Take the ‘Witching Hour’ page and cut to 7” wide by 4 ¾” high and using the middle photo slot die from Curved Photo Slots Set 2 line up centrally and run through die cutting machine.

Ink edges and carefully glue on the back; it helps to put a photo mat in (see photo on page 1) and stick down to the plain side of page with no pocket.

Page 6:
Take ‘Tick Tock’ and cut to 7” wide then you need to cut it again into 2 pieces of different heights, one to 7” wide x 1 ½” high and another piece to 7” wide x 3 1/8” high.

Ink edges and stick down.

Page 7:
Take the ‘Tick Tock’ page and cut to 7” wide by 4 ¾” high, and using the middle photo slot die from Curved Photo Slots Set 2 line up centrally and run through die cutting machine.

Ink edges and carefully glue on the back; it helps to put a photo mat in (see photo on page 1) and stick down to the plain side of page with no pocket.

Page 8: Please cut page 9 mat first
Take ‘Nevermore’ left over from page 9 and cut to 7” wide x 1 ½” high and then from the ‘Frightful Folly’ page cut a piece to 7” wide x 3 1/8” high.

Ink edges and stick down.
We hope you can join us next month for the third and finale part of Mandy's fabulous journal, and don't forget if you are following along and creating your own journal, or indeed any other CoolKatz project, pop over to our CoolKatz Facebook group and share your projects. We love to see your creations using our CoolKatz products.
And if you haven't seen the first part of the Simple Steampunk Album the link is just below so you can catch up.
So until next time.
Happy Crafting
The CoolKatz Team x
https://www.coolkatzcraft.com/