free UK postage
over £40.00
Search


This week we are again super excited to be joined by a Guest Designer. Please welcome the incredibly talented Fay who has created an amazing Bar Hut, a girl after my own heart!
Over to Fay to tell you how she created it.
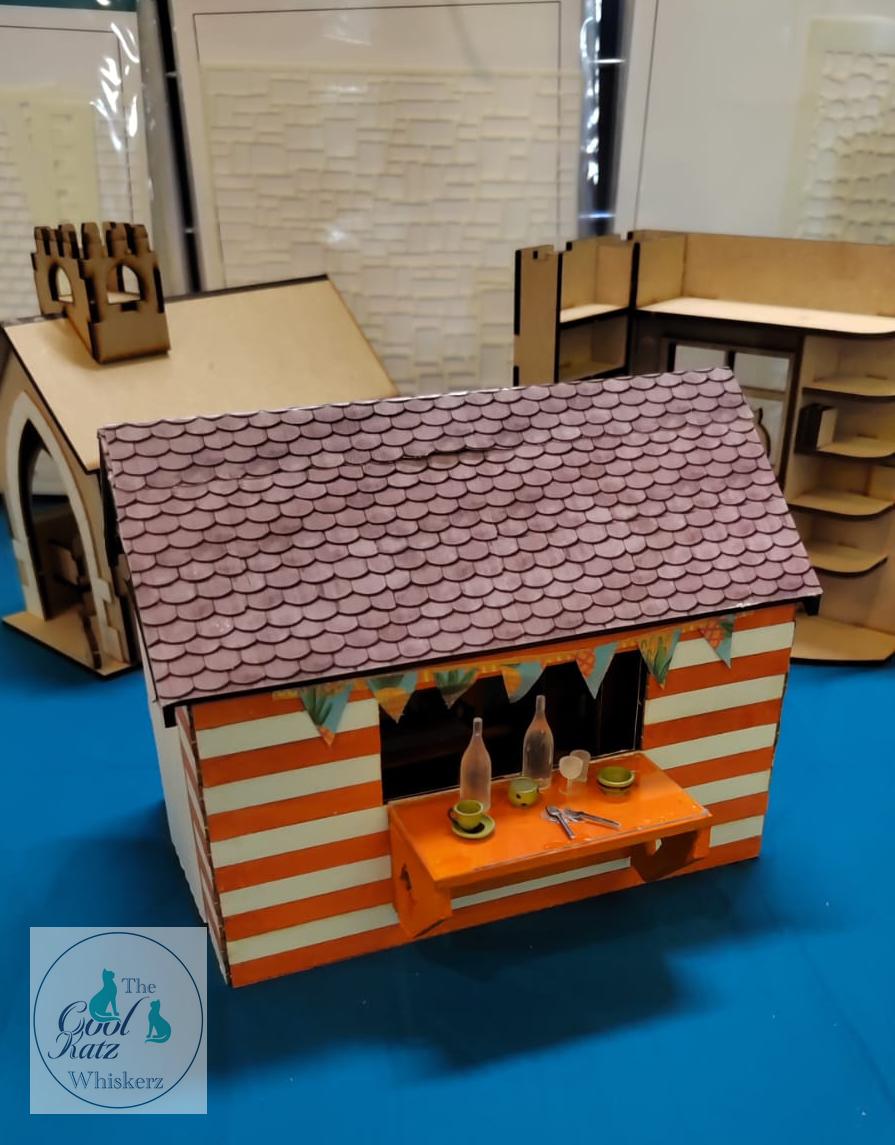
The shed I went with a different theme. When I started the shed it was lovely weather and friends were talking about meeting up for a BBQ. This was the inspiration! Wouldn’t be be great to have a bar shed in the garden to chill, drink and chat.
I started with the same process of watching the CoolKatz video and then laying out the pieces. I decided early on that this shed would be bright and colourful. I built the shell of the shed and then split the wooden slats into white unpainted and painted ones. I kept the painted slats on the card sheet and painted with an almost dry paintbrush (making sure I didn’t make the card too wet). I liked the look of tiles on the roof so the roof section was painted black and roof tile printed sheet was glued on.
The end window leftovers I thought looked just like the sides of a cabinet. I cut longer left over pieces into rectangular sections and used the masking tape method to glue it together. After mailing I realized that the cabinet was too tall so the top triangular section was cut when placing together.

I decided early on by looking at the left over pieces that a bar window could easily be created. I used a large rectangle of wood and two triangles left over pieces to create a bar. I cut the window also to create a bigger opening. The bar was painted in a bright orange and the window perspex was added to the bar top to protect it from spilt flavoured water!! The shed needed to be a bright place to chill and have fun so I cut pieces of 12x12 card to use as wallpaper. I made sure that the paper selected had smaller pattern. I placed the card onto the outside and drew around. One piece of advice if making again would be to draw around the pieces onto the card first. This would make this bit a bit easier rather than my trial and error method.

I had some left over rectangles so made a table and bench. The first attempt was too tall so both were cut down to fit under the window. I thought this was a better scale. After adding the slats to the shed I realized I had leftover slats. I added these to the top of the table and bench to create a coordinated look.


No shed would be complete without some plants. I couldn’t find pots big enough but had some foam in the box that the kit came in. I cut these into a square shape and then used a glue gun and garden twine to make pots. I put four lines of glue along the four sides and quickly wrapped the twine around. This was an effective but a slightly painful and burning experience!! Leaves were cut using the fantastic cheese plant and sword leaf dies and then glued into the pots.
Finally, the shed would not be complete without cutlery, cups, plates and wine bottles. I used the miniature kit and alcohol pens to decorate. I added glue to the wine bottles to create a glass like feel. These were glued around the shed to create a used look. I create paper bunting with the leftover pieces of paper and added he outside to coordinate the inside and outside.
As I said before, I have absolutely loved creating the greenhouse and shed. The kits fit together so well. The videos and guide allow you to follow whatever method works best for you. The main thing is that there are lots of possibilities and can easily be adapted. Try not to think too much. I made many mistakes and as a messy crafter they are not perfect in any way. Make, adapt and more importantly have fun. If you have fun and like your outcome then you have achieved.
Now we are all in the mood to head to the beach, I know I am. Isn't it wonderful to meet and find out a little more about our Guest Designers?
Thank you so much Fay.
If you would like to share your CoolKatz projects pop over via the links below to our Facebook group, where you will also find lots more
inspiration. And for more construction tutorials pop over to our YouTube channel where you will find a library full of those.
Happy Crafting
The CoolKatz Team x
https://www.youtube.com/@CoolKatzCraft
https://www.facebook.com/groups/CoolKatz
https://www.coolkatzcraft.com/home
https://www.coolkatzcraft.com/mini-roof-tile-die-strips
https://www.coolkatzcraft.com/coolkatzcutz-set-of-10-complete-never-ending-banner-dies-
classic-decorative
https://www.coolkatzcraft.com/book-nook-intriguer-a-shed-of-your-own
https://www.coolkatzcraft.com/miniature-glassware-set